Data sharding is the breakthrough technique of the modern data-driven era. It eliminates the limitation that a single database server can store and process only a certain amount of data.
Data sharding enables users to store the data across different database servers. Therefore, it improves response time and supports scalability.
This blog post gives you in-depth knowledge about MongoDB sharding. It also provides you guidance on setting up this sharding.
MongoDB Overview
Before we learn about MongoDB sharding, let’s get to know MongoDB.
MongoDB is an open-source document-oriented NoSQL database. It has been used by several prominent companies, including Facebook, Google, and eBay.
MongoDB lets users store data in flexible, JSON-like documents. Since this database features schema design, it can handle unstructured data. Consequently, it has become the first choice for most modern web applications.
Unlike conventional relational database systems, MongoDB can manage a large amount of data. The best thing is that users can integrate MongoDB with all prominent programming languages, such as PHP, Python, Java, Node.js, C, C++, and more.
What is MongoDB Sharding?
Most companies use NoSQL databases to deal with storage and computing requirements of high-volume data. Sharding in MongoDB is a method that helps individuals distribute a database horizontally through different nodes. These nodes or servers are called “Shards”.
Each shard can handle a portion of the data, creating a sharded cluster. It helps MongoDB manage the large volume of data and user concurrency efficiently.
Each shard works as a unique database in a sharded cluster. They are accountable for storing and handling data. As soon as the data is added to the cluster, the balancer of MongoDB reallocates it across the shards. Thus it makes sure the workload is equally distributed.
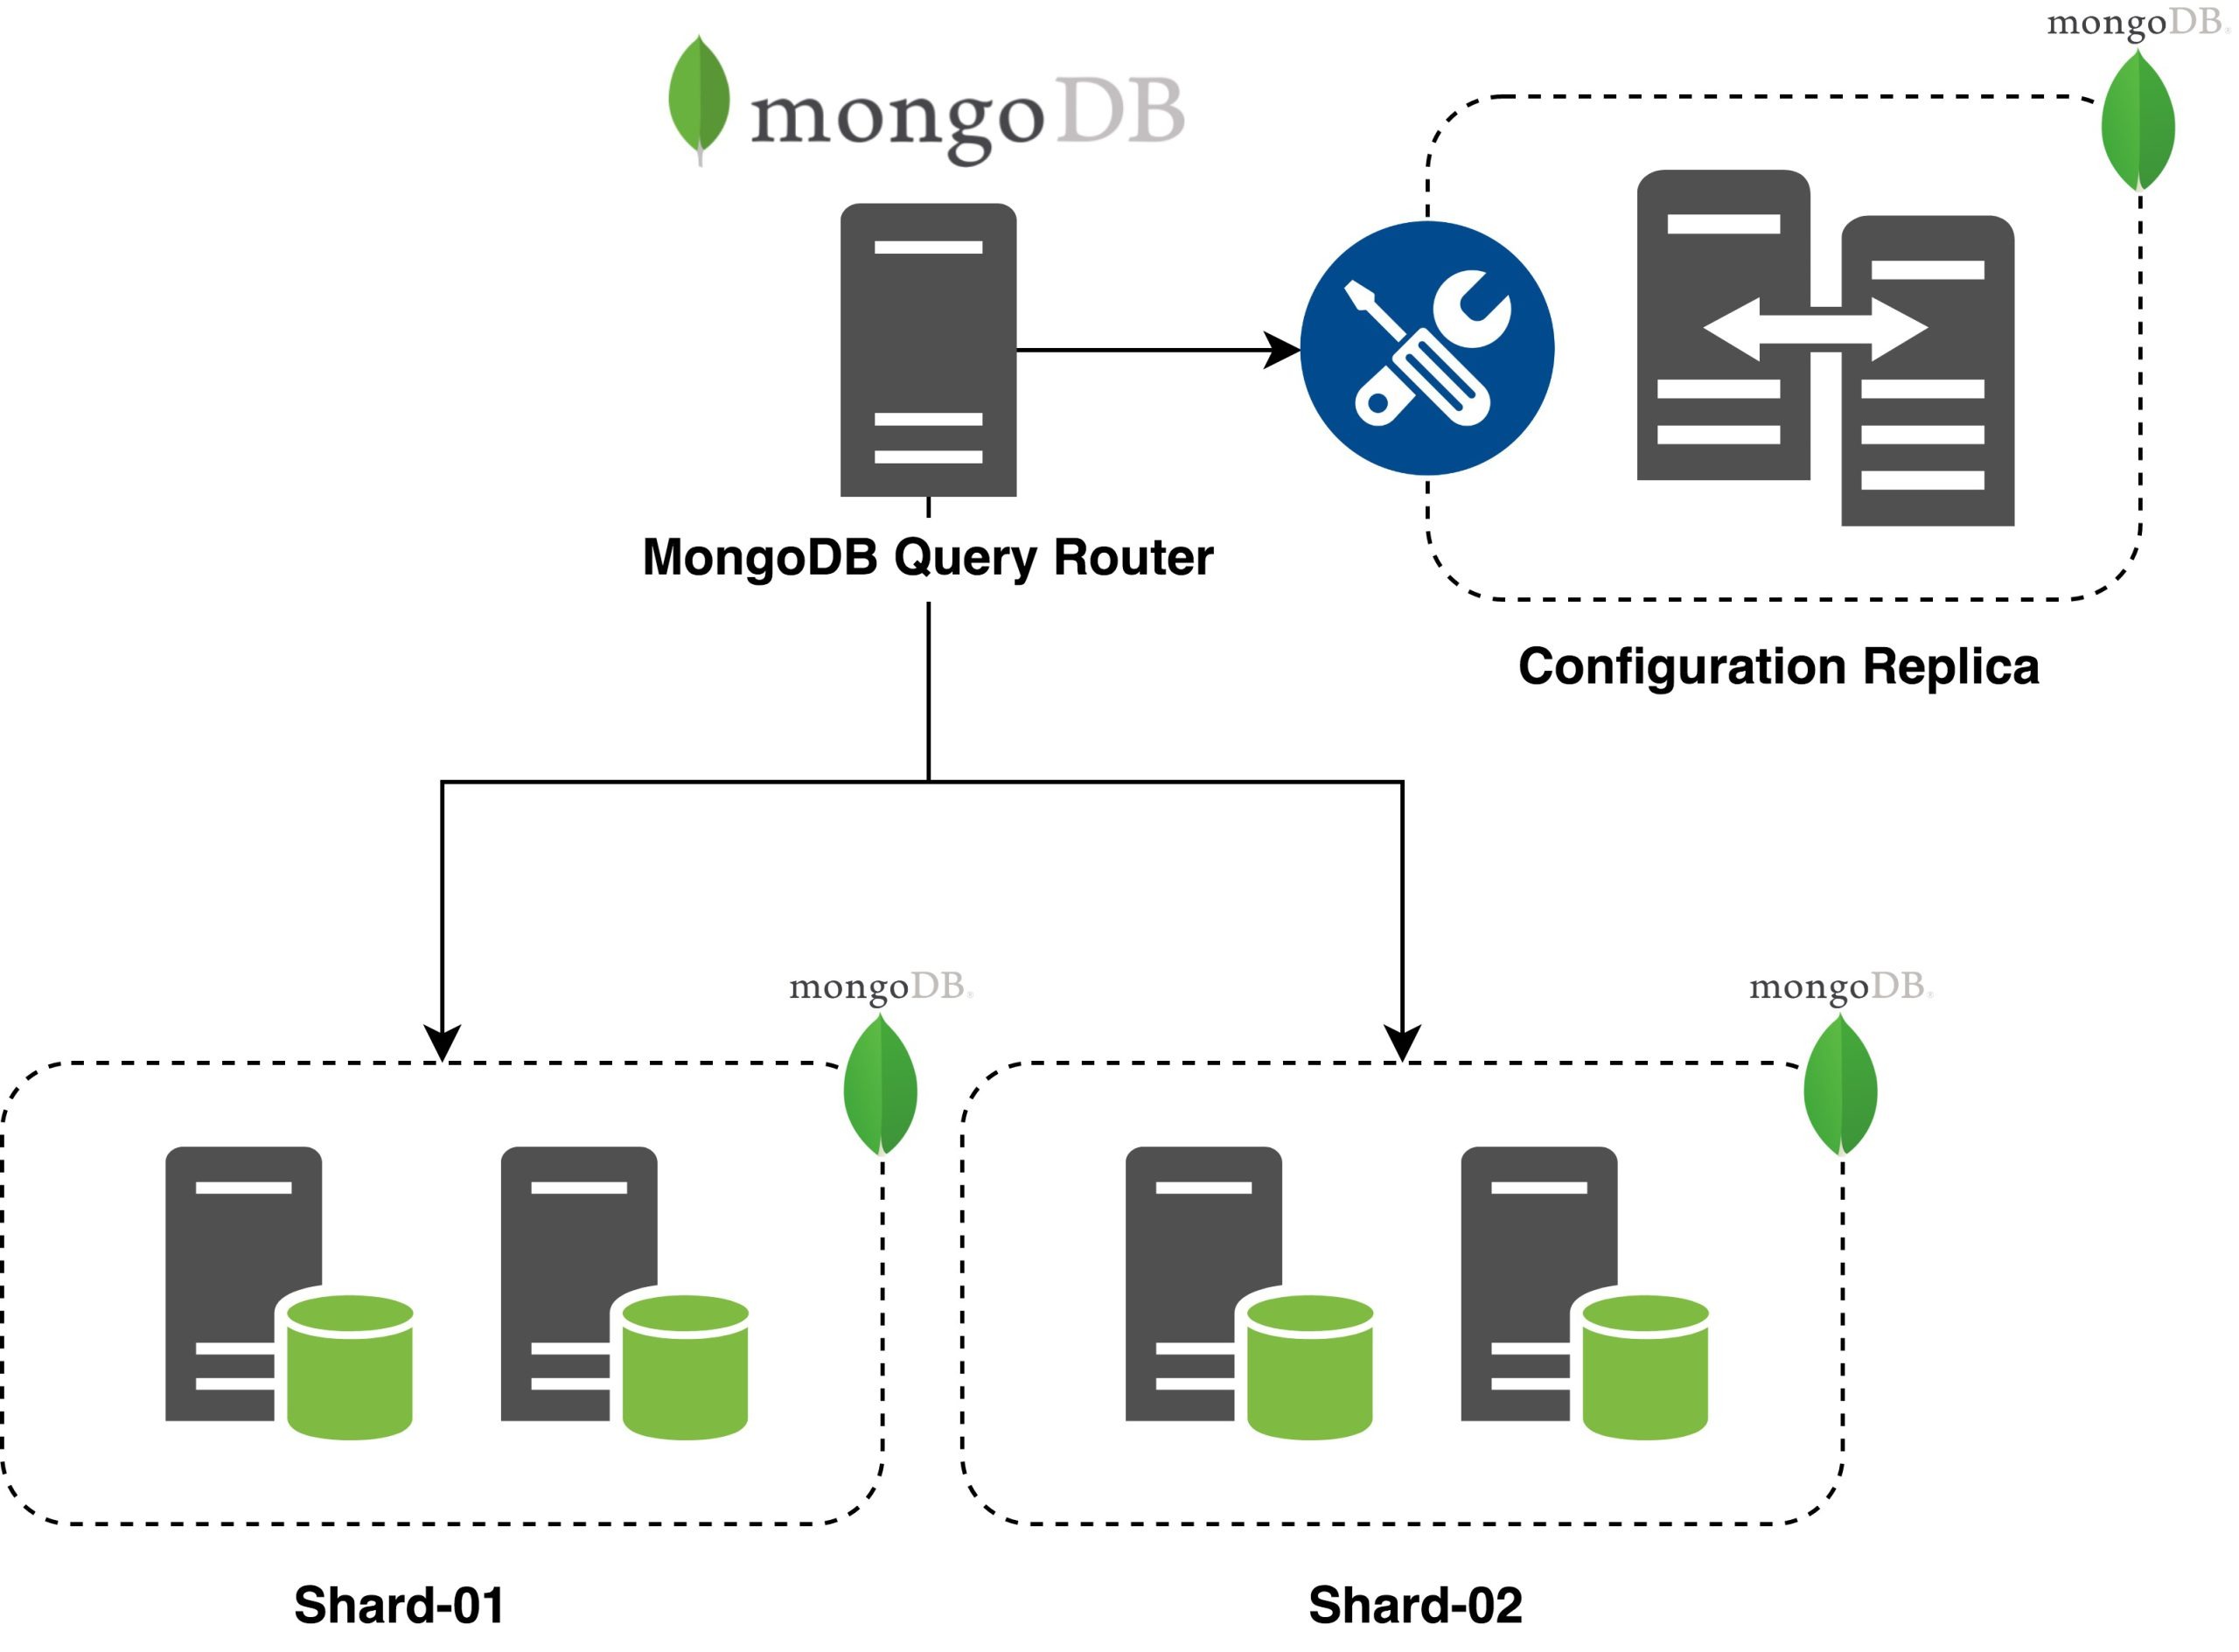
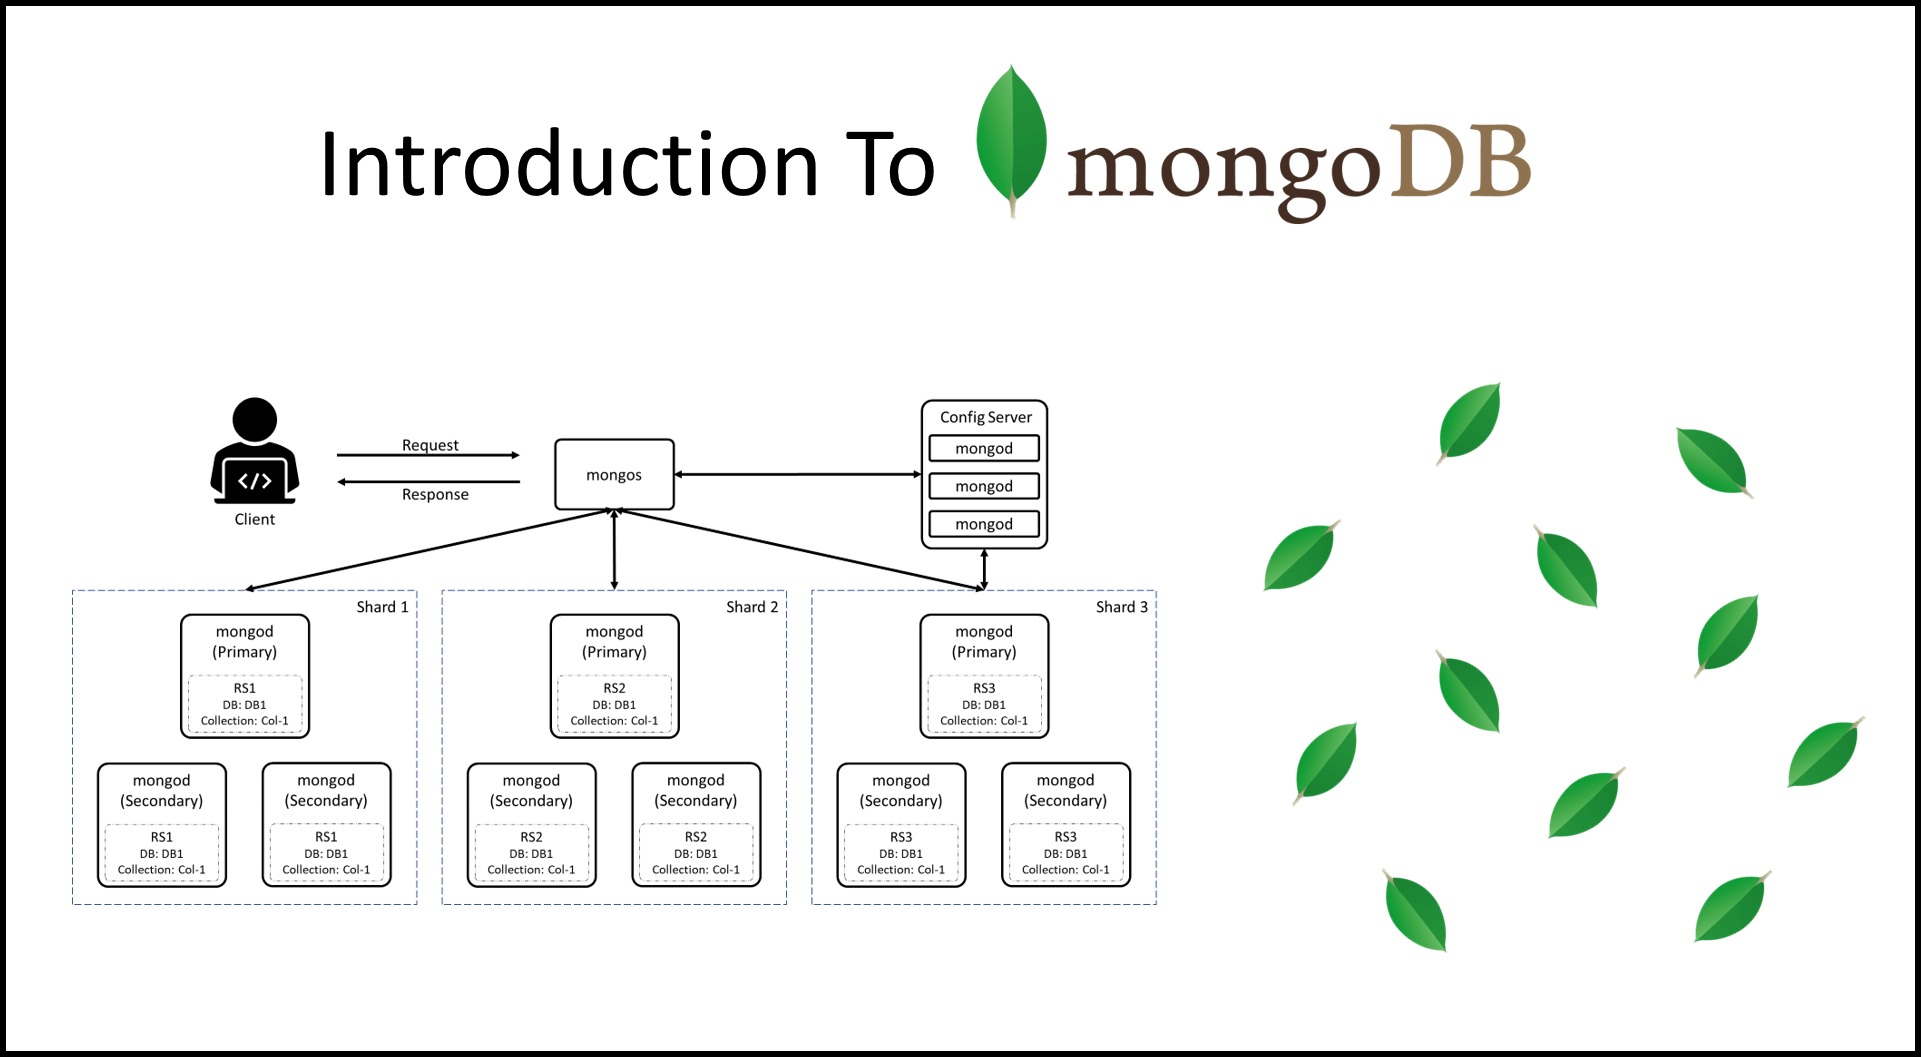
The architecture of sharding consists of the following elements:
Shard Servers
These servers are separate nodes within the sharded cluster. Each node collects a subset of the data and acts as an independent database. MongoDB circulates data across the shard servers to ensure even distribution.
Config Servers
These servers keep the metadata and configuration information for the sharded cluster.
Query Routers
Also referred to as “Mongos”, these routers work as the interface between the sharded cluster and applications. Query routers receive requests and queries to the suitable shards and combine results as required.
As Mongos processes hide the underlying sharding complexity from the application, it looks like a single logical database.
Shard key
The shard key is a field that determines how data will be distributed in different shards. For even data distribution and efficient querying, it is necessary to choose the right shard key.
Chunk
A chunk constitutes a data range housed within a shard. It is decided by the shard key. Chunks are data migration units between shards.
Balancer
Balancer assures the uniform distribution of data amid the shards. Once data is added or eliminated, the balancer distributes data chunks between shards.
Steps to Set up MongoDB Sharding
You will require three servers to set up sharding in MongoDB. One for the config server and another for the Mongos instance. The last one is required for the shards.
Here are step-by-step instructions to set up sharding in MongoDB.
1. Make a Directory Using Config Server
First, you need to create a directory for the config server data. You can do this by running the below command on the 1st server.
mkdir /data/configdb
2. Begin MongoDB in Config Mode
Once you have created the directory, your next step will be starting MongoDB in config mode on the 1st server. Use this command in order to do it.
mongod –configsvr –dbpath /data/configdb –port 27019
The command will begin the config server on port 27019 and store all the data in the /data/configdb directory.
Note: We are employing the –configsvr flag to specify this server’s role as a config server.
3. Start Mongos Instance
Next, start the process of Mongos instance. It will route queries to the accurate shards depending on the sharding key. Use the following command to begin this process.
mongos –configdb <config server>:27019
Remember, you have to replace <config server> with the hostname/IP address of the machine where the config server is running.
4. Connect to Mongos Instance
Use MongoDB shell to connect to Mongos instance. Below is the command to perform this.
mongo –host <mongos-server> –port 27017
In the above command, replace <mongos-server> with the IP address or hostname of the server running the mongos instance. The command will open up the MongoDB shell and let you interact with Mongo’s instance, and add servers to the cluster.
5. Add Servers to Clusters
Once you are connected to the mangos instance, add servers to the cluster. Use the following command:
sh.addShard(“<shard-server>:27017”)
In the above command, you need to replace <shard-server> with the hostname or IP address of the server running the shard. It will add the shard to the cluster so that it is available for utilization.
Repeat this step for each shard you need to add to the cluster.
6. Permit Sharding for Database
In the end, you need to enable sharding for a database. Here is the command for this process:
sh.enableSharding(“<database>”)
Replace <database> with the name of the database you want to shard. It will allow sharding for the particular database, enabling you to share its data across different shards.
Congratulations! Now you have a fully functional MongoDB sharded cluster to handle high-traffic loads.
Final Words
Undoubtedly, MongoDB sharding is a robust technique supporting the horizontal scaling of databases. It allows a database to handle extensive data loads without compromising on performance.
We hope this post gives you adequate information on MongoDB sharding. You can leverage the power of sharding and make the best use of your hardware resources.