
Ceph Persistent Storage for Kubernetes with Cephfs

Kubernetes is a prominent open-source orchestration platform. Individuals use it to deploy, manage, and scale applications. It is often challenging to manage stateful applications on this platform, especially those having heavy databases. Ceph is a robust distributed storage system that comes to the rescue. This open-source storage platform is known for its reliability, performance, and scalability. This blog post guides you on how to use Ceph persistent storage for Kubernetes with Cephfs. So let us learn the process step-by-step. Before we jump into the steps, you must have an external Ceph cluster. We assume you have a Ceph storage cluster deployed with Ceph Deploy or manually. Step 1: Deployment of Cephfs Provisioner on Kubernetes Deployment of Cephfs Provisioner on Kubernetes is a straightforward process. Simply log into your Kubernetes cluster and make a manifest file to deploy the RBD provisioner. It is an external dynamic provisioner that is compatible with Kubernetes 1.5+. vim cephfs-provisioner.yml Include the following content within the file. Remember, our deployment relies on RBAC (Role-Based Access Control). Therefore, we will establish the cluster role and bindings before making the service account and deploying the Cephs provisioner. — kind: Namespace apiVersion: v1 metadata: name: cephfs — kind: ClusterRole apiVersion: rbac.authorization.k8s.io/v1 metadata: name: cephfs-provisioner namespace: cephfs rules: – apiGroups: [""] resources: ["persistentvolumes"] verbs: ["get", "list", "watch", "create", "delete"] – apiGroups: [""] resources: ["persistentvolumeclaims"] verbs: ["get", "list", "watch", "update"] – apiGroups: ["storage.k8s.io"] resources: ["storageclasses"] verbs: ["get", "list", "watch"] – apiGroups: [""] resources: ["events"] verbs: ["create", "update", "patch"] – apiGroups: [""] resources: ["services"] resourceNames: ["kube-dns","coredns"] verbs: ["list", "get"] — kind: ClusterRoleBinding apiVersion: rbac.authorization.k8s.io/v1 metadata: name: cephfs-provisioner namespace: cephfs subjects: – kind: ServiceAccount name: cephfs-provisioner namespace: cephfs roleRef: kind: ClusterRole name: cephfs-provisioner apiGroup: rbac.authorization.k8s.io — apiVersion: rbac.authorization.k8s.io/v1 kind: Role metadata: name: cephfs-provisioner namespace: cephfs rules: – apiGroups: [""] resources: ["secrets"] verbs: ["create", "get", "delete"] – apiGroups: [""] resources: ["endpoints"] verbs: ["get", "list", "watch", "create", "update", "patch"] — apiVersion: rbac.authorization.k8s.io/v1 kind: RoleBinding metadata: name: cephfs-provisioner namespace: cephfs roleRef: apiGroup: rbac.authorization.k8s.io kind: Role name: cephfs-provisioner subjects: – kind: ServiceAccount name: cephfs-provisioner — apiVersion: v1 kind: ServiceAccount metadata: name: cephfs-provisioner namespace: cephfs — apiVersion: apps/v1 kind: Deployment metadata: name: cephfs-provisioner namespace: cephfs spec: replicas: 1 selector: matchLabels: app: cephfs-provisioner strategy: type: Recreate template: metadata: labels: app: cephfs-provisioner spec: containers: – name: cephfs-provisioner image: "quay.io/external_storage/cephfs-provisioner:latest" env: – name: PROVISIONER_NAME value: ceph.com/cephfs – name: PROVISIONER_SECRET_NAMESPACE value: cephfs command: – "/usr/local/bin/cephfs-provisioner" args: – "-id=cephfs-provisioner-1" serviceAccount: cephfs-provisioner Next, apply the manifest. $ kubectl apply -f cephfs-provisioner.yml namespace/cephfs created clusterrole.rbac.authorization.k8s.io/cephfs-provisioner created clusterrolebinding.rbac.authorization.k8s.io/cephfs-provisioner created role.rbac.authorization.k8s.io/cephfs-provisioner created rolebinding.rbac.authorization.k8s.io/cephfs-provisioner created serviceaccount/cephfs-provisioner created deployment.apps/cephfs-provisioner created Make sure that the Cephfs volume provisioner pod is in the operational state. $ kubectl get pods -l app=cephfs-provisioner -n cephfs NAME READY STATUS RESTARTS AGE cephfs-provisioner-7b77478cb8-7nnxs 1/1 Running 0 84s Step 2: Obtain the Ceph Admin Key and Create a Secret on Kubernetes Access your Ceph cluster and retrieve the admin key to be used by the RBD provisioner. sudo ceph auth get-key client.admin Save the value of the admin user key displayed by the above command. Later, we will incorporate this key as a secret in Kubernetes. kubectl create secret generic ceph-admin-secret \ –from-literal=key='<key-value>' \ –namespace=cephfs Where <key-value> is your Ceph admin key. Verify the creation by using the following command. $ kubectl get secrets ceph-admin-secret -n cephfs NAME TYPE DATA AGE ceph-admin-secret Opaque 1 6s Step 3: Make Ceph Pools for Kubernetes and Client Key To run a Ceph file system, you will need at least two RADOS pools, one for data and another for metadata. Usually, the metadata pool contains only a few gigabytes of data. Generally, individuals use 64 or 128 for large clusters. Therefore, we recommend a small PG count. Now let us make Ceph OSD pools for Kubernetes: sudo ceph osd pool create cephfs_data 128 128 sudo ceph osd pool create cephfs_metadata 64 64 Create a Ceph file system on the pools. sudo ceph fs new cephfs cephfs_metadata cephfs_data Confirm Ceph File System Creation. $ sudo ceph fs ls name: cephfs, metadata pool: cephfs_metadata, data pools: [cephfs_data ] UI Dashboard Confirmation Step 4: Make Cephfs Storage Class on Kubernetes A StorageClass serves as a means to define the “classes” of storage you offer in Kubernetes. Let’s create a storage class known as “Cephrfs.” vim cephfs-sc.yml Add the following content to the file: — kind: StorageClass apiVersion: storage.k8s.io/v1 metadata: name: cephfs namespace: cephfs provisioner: ceph.com/cephfs parameters: monitors: 10.10.10.11:6789,10.10.10.12:6789,10.10.10.13:6789 adminId: admin adminSecretName: ceph-admin-secret adminSecretNamespace: cephfs claimRoot: /pvc-volumes Where: ⦁ Cephfs is the name of the StorageClass to be created. ⦁ 10.10.10.11, 10.10.10.12 & 10.10.10.13 are the IP addresses of Ceph Monitors. You can list them with the command: $ sudo ceph -s cluster: id: 7795990b-7c8c-43f4-b648-d284ef2a0aba health: HEALTH_OK services: mon: 3 daemons, quorum cephmon01,cephmon02,cephmon03 (age 32h) mgr: cephmon01(active, since 30h), standbys: cephmon02 mds: cephfs:1 {0=cephmon01=up:active} 1 up:standby osd: 9 osds: 9 up (since 32h), 9 in (since 32h) rgw: 3 daemons active (cephmon01, cephmon02, cephmon03) data: pools: 8 pools, 618 pgs objects: 250 objects, 76 KiB usage: 9.6 GiB used, 2.6 TiB / 2.6 TiB avail pgs: 618 active+clean Once you have updated the file with the accurate value of Ceph monitors, give the Kubectl command to make the StorageClass. $ kubectl apply -f cephfs-sc.yml storageclass.storage.k8s.io/cephfs created Next, list all the available storage classes: $ kubectl get sc NAME PROVISIONER RECLAIMPOLICY VOLUMEBINDINGMODE ALLOWVOLUMEEXPANSION AGE ceph-rbd ceph.com/rbd Delete Immediate false 25h cephfs ceph.com/cephfs Delete Immediate false 2m23s Step 5: Do Testing and Create Pod Create a test persistent volume claim to ensure that everything is smooth. $ vim cephfs-claim.yml — kind: PersistentVolumeClaim apiVersion: v1 metadata: name: cephfs-claim1 spec: accessModes: – ReadWriteOnce storageClassName: cephfs resources: requests: storage: 1Gi Apply manifest file $ kubectl apply -f cephfs-claim.yml persistentvolumeclaim/cephfs-claim1 created The successful binding will show the bound status. $ kubectl get pvc NAME STATUS VOLUME CAPACITY ACCESS MODES STORAGECLASS AGE ceph-rbd-claim1 Bound pvc-c6f4399d-43cf-4fc1-ba14-cc22f5c85304 1Gi RWO ceph-rbd 25h cephfs-claim1 Bound pvc-1bfa81b6-2c0b-47fa-9656-92dc52f69c52 1Gi RWO cephfs 87s Next, we can launch a test pod using the claim we made. First, create a file to store that data: vim cephfs-test-pod.yaml Add content
How to choose a Freelance Full Stack Web Developer
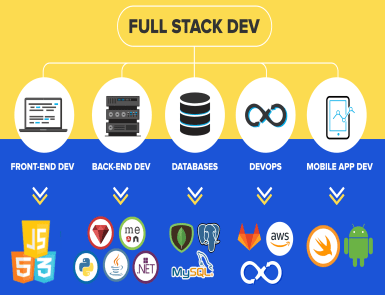
Hiring a full-stack web developer is a crucial decision for any web development company. The kind of candidate they choose can make or break their project’s aspiration. Full-stack web development requires comprehensive knowledge of developing, testing and deploying web applications. Consequently, you can’t hire any random developer you find on a job portal or the web. Companies that want to recruit a freelance full-stack web developer but don’t know how to get started must read this post. Below, we have accumulated factors to consider when selecting a full-stack web developer. So let’s get started. Step 1: Define Your Project Requirements Clearly Before you begin searching for a full-stack web developer, learn your project requirements. Define the scope of work, the end goal, and the technologies required for the same. It will help you determine the search criteria for a suitable web developer. Step 2: Consider the Skills of the Developer A full-stack web developer is a versatile professional. They must be skilled in both front-end and back-end development. Ensure the developer has the required skill set your project needs. Make a list of programming languages, software, and frameworks needed for the project. On this basis, you can decide the kind of web developer you need. Generally, skills to look for in a full-stack web developer include: Front-end development: Expertise in HTML, CSS, and JavaScript. Furthermore, the developer must have experience in front-end libraries and frameworks. Back-end Development: Knowledge of programming languages, including Node.js and Python is crucial. It will be advantageous if the developer is familiar with back-end frameworks such as Flask or Express. Database Management: Knowledge of different kinds of databases, both SQL and NoSQL, is also essential. Step 3: Check Portfolio Don’t forget to check the portfolio and experience of your potential web developer. A strong portfolio validates the skills and capability of a developer to work on real-world projects. You can visit their websites to learn about past clients and projects they completed. Though certifications alone do not confirm expertise, you can check relevant certifications to validate the developer’s skills. Step 4: Geographical Location of Freelancer The accessibility of the internet has removed all the limits of geographical boundaries. In this digital era, you do not need to confine yourself to locally available talents. You can hire developers from all over the globe. Make sure the freelancer can work in the time zone you prefer. Step 5: Set a Clear Budget and Timeline Before you finalize a full-stack developer and sign a contract, set a clear budget and timeline for the project. It will help you manage the overall cost and period of your project. The cost of hiring a full-stack developer depends on the experience and timeline of the project. Some freelancers charge on an hourly basis, while others have a set fee. Discuss the budget with your freelancer by describing your project requirements. Also, ask them about the expected timeline for the project. You can break down the timeline for your project into different stages. It will help you manage your time effectively. Step 6: Communication Skills You cannot deny the importance of effective communication in web development. Go for a full-stack developer having strong communication skills. A developer has to work with a website designer, other developers, and project managers. An effective communication ensures a smooth workflow. Developers with good communication skills can efficiently convey ideas, address concerns, and update managers about the work progress. Step 7: Team Collaboration The developer you choose must have the ability to work well with others. In a modern web development environment, developers, designers, and testers work together symphonically. Step 8: Conduct Interviews Once you have shortlisted some possible full-stack developers, conduct interviews to choose the most suitable one. An interview will help you get more insight into whether or not a candidate is proficient in meeting project requirements. Evaluate the technical expertise, background, and communication skills of candidates carefully. To assess technical knowledge, you can give programming exercises. If you do not have adequate technical experience and do not know how to check the skills of a full-stack web developer, give preference to a senior full-stack web developer with a lot of experience. Step 9: Make Clear Contracts Make sure billing contracts are clear to you and your freelancers. The contract clearly defines the responsibility of a freelancer and payment terms. The payment terms must include the details of the wage structure, rate, payment schedule and more. These are a few things to consider when hiring a full-stack web developer. Let us learn whether a freelancer or company is a good choice for you. Full-Stack Web Developer: Freelancer vs. Company (Quick Comparison) Whether to choose a freelancer or a company depends on your project requirements, budget and preferences. When you work with a freelancer, you get the following benefits: Affordability Most freelancers charge a lower fee than an established web development company. If you have a limited budget, choosing a freelancer is a good decision. Flexible You have the flexibility to hire freelancers for short-term, long term or just for a specific task. Personalized Attention Since you will work directly with the developer, it will form a close working relationship. Therefore, the freelancer gives personalized attention to your project. The advantages of working with a web development company are below: More Resources Companies have more tools and technologies to manage your projects comparatively. An agency can employ dedicated managers on your project. Scalability As your project grows, you will need more resources to expand your services. Companies can better handle scalability. Delivery Time With most companies, you can expect quick delivery of your project. Conclusion If you are a small company, hiring a freelance web developer is beneficial for you. They are not just affordable but also flexible. On the other hand, if you are a big company with unlimited tasks and a substantial budget, choose a web development company.
The Ultimate Guide to GitLab CI/CD: Along with Example of Building CI/CD Pipeline for Python
No one can deny the significance of CI (Continuous Integration) and CD (Continuous Deployment) in software development. They enable a coder to integrate and deploy software codes and identify possible issues simultaneously. Consequently, the process naturally saves the time and effort of a developer. While several platforms support CI/CD, GitLab has grown in popularity. It automates software development in several aspects. This guide makes you aware of the features of GitLab CI/CD. In addition, you will learn to build CI/CD pipelines on GitLab. So let us get started. What is GitLab CI/CD? CI stands for Continuous Integration, while CD for Continuous Deployment/Delivery. CI supports the continuous integration of code changes from various contributors into a shared repository. On the other hand, CD allows code deployment while being developed. GitLab CI/CD is a set of tools and techniques automating software development. It enables users to create, test and deploy code changes inside the GitLab to the end users. The platform aims to support consistent workflow and improve the speed and quality of code. Features of GitLab CI/CD GitLab has several benefits over conventional software development methods. Some key benefits are as per below: ⦁ GitLab keeps CI/CD and code management in the same place. ⦁ It’s a cloud-hosted platform. You do not need to worry about setting up and managing databases or servers. ⦁ You can sign up for the subscription plan that suits your budget. ⦁ You can run different types of tests, such as unit tests, integration tests, or end-to-end tests. ⦁ GitLab automatically builds and tests your code changes as they are pushed to the repository. ⦁ Since GitLab CI/CD is built-in, there is no need for plugin installation. ⦁ The platform supports continuous code collaboration and version control. The Architecture of GitLab CI/CD GitLab CI/CD architecture consists of the following components: GitLab Server Like every online platform, GitLab works on a server. The GitLab server is accountable for hosting all your Git repositories. It helps you keep your data on the server for your client and team. The GitLab server hosts your applications and configures the pipeline. It also manages the pipeline execution and assigns jobs to the runners available. GitLab.com is run by a GitLab instance that further comprises an application server, database, file storage, background workers, etc. Runners Runners are applications that run CI/CD pipelines. GitLab has several runners configured. Every user can access these runners on gitlab.com. Users are allowed to set up their own GitLab runners. Jobs Jobs are tasks performed by the GitLab pipeline. Each job has a unique name and script. Each script gets finished one after the other. A user moves on to the next one only when the previous one is complete. Stages Stages are referred to the differences between jobs. They ensure the completion of jobs in the pipeline. For instance, testing, building, and deploying. Pipeline The pipeline is a complete set of stages. Every stage comprises single or multiple jobs. You can find various types of pipelines in GitLab. These types include basic pipelines, multi-branch pipelines, merge request pipelines, parent-child pipelines, scheduled pipelines, multi-job pipelines, etc. Commit Commit is a record of changes made in the code or files. It is similar to what we see in a GitHub repository. So this is an architecture of GitLab CI/CD. Let us learn how to build a simple CI/CD pipeline with GitLab. Building a Simple CI/CD pipeline for a Python Application 1. First, create an account on GitLab. 2. Next, create a new project. You get four different options to create your project. Choose any method convenient to you. In this example, we will import the project from GitHub. 3. Once the project is set up, create a yaml file. Give it a name that is easy to remember. For example, .gitlab-ci.yml. Above is an example of tests run. Image: It is the image we intend to use to execute our script. before_script: Before script helps you install the prerequisites required to run your scripts. It also includes commands you need to run before the script command. after_script: This script outlines commands running after each job. It may also include failed jobs handling. To add the Python image, we are using images available on DockerHub. 4. Under the CI/CD tab, you will find the ‘Jobs’ tab to get detailed logs and troubleshooting. 5. Next, create an account on DockerHub. You can find the image for Docker on Dockerhub. 6. Go back to the yaml script and write a script to upload the docker image to the repository. You will need to use credentials. To ensure the safety of credentials, use another GitLab feature. Go to Settings-> CI/CD-> Variables Here you can make global variables that you can refer to in the code. If you use the masked variable option, it will prevent the visibility of variable content in logs. 7 Next, upload the image to a private repository. Tag the repository name in Dockerhub. It will help you when writing the Docker push command. The stage clause guarantees that each stage will execute one after another. You can create variables both globally and inside the jobs. You can use them as: $var1 8. In our example, we are following docker in the docker concept. It means we have to make docker available inside its container. The docker client and daemon are inside the container to execute the docker command. 9. Now it is time for the preparation of the deployment server. The process involves configuring the tools and settings to automate the deployment. You can use any remote server. In this example, we are using an Ubuntu server. 10. We used the following command to create a private key. ssh-keygen The method to create a private variable is the same as mentioned in step 6. 11. Next, add the yaml script. Before using the docker run command, stop existing containers. Especially those running on the same port. For this, we have added line 37. By default,
GitOps Explained — Principles, Deployment, and Best Practices
In the ever-evolving landscape of software development, efficient deployment practices have become crucial to stay ahead of the competition and deliver high-quality products. GitOps has emerged as a cutting-edge methodology, fostering collaboration, scalability, and reliability. As it leverages version control systems like Git, GitOps enables teams to maintain a declarative representation of the desired system state, streamlining the deployment process and ensuring consistency across different environments. From understanding the core components of GitOps to implementing the most effective deployment strategies, this article aims to equip readers with the knowledge and tools to excel in the dynamic world of modern software deployment. So, let’s get started! What is GitOps? — Core Components to Excel GitOps is an advanced software deployment paradigm that revolves around the principle of “desired state” and Git version control system. The core concept involves describing the desired configuration and state of a system declaratively and storing it in a Git repository. All changes to the system, whether they pertain to application code or infrastructure settings, are represented as Git commits in the repository. The Git repository serves as the single source of truth, reflecting the actual state of the system. CI/CD pipelines, tightly integrated with the Git repository, automatically detect changes and reconcile the system state with the desired state defined in Git. The entire deployment process is thus version-controlled and auditable. CI/CD (Continuous Integration and Continuous Deployment) Continuous Integration and Continuous Deployment (CI/CD) is a fundamental aspect of GitOps. CI/CD pipelines automate the process of building, testing, and deploying code changes to production or staging environments. By integrating version control systems with CI/CD pipelines, GitOps ensures that every change made to the codebase goes through automated testing and verification before being deployed, enhancing the overall quality and reliability of the software. IaC (Infrastructure as Code) Infrastructure as Code (IaC) is a key principle in GitOps. It involves managing infrastructure configurations in a version-controlled manner, just like application code. As it describes the desired infrastructure state in code, GitOps allows teams to automate the provisioning of infrastructure resources. This approach eliminates manual setup and reduces the risk of configuration drift, leading to more predictable and reproducible deployments. MRs and PRs (Merge Requests and Pull Requests) Merge Requests (MRs) in GitLab or Pull Requests (PRs) in GitHub play a crucial role in the GitOps workflow. They serve as collaboration platforms for code reviews and discussions among team members. Before changes are applied, they undergo thorough review, testing, and validation through MRs or PRs, ensuring that only well-tested and approved changes are merged into the main codebase. Principles of GitOps Declarative System The declarative system is a fundamental concept in GitOps. Instead of defining the sequence of actions to achieve a particular state, GitOps focuses on describing the desired end state of the system. The Git repository serves as the single source of truth, containing all the necessary configurations to achieve that state. As a result, GitOps ensures that the system converges to the desired state automatically, making it easier to manage and audit changes. System State Captured in a Git Repository GitOps relies on maintaining a Git repository as the central repository for the desired system state. All changes, whether related to infrastructure or application code, are committed and version-controlled in the repository. This approach provides a historical record of changes, enabling teams to track the evolution of the system and easily roll back to a previous known state if needed. Automatic Deployment With GitOps, deployments are automated based on changes to the Git repository. Whenever a new commit is pushed to the repository, the system automatically applies the changes to the target environment. This automation reduces manual intervention, minimizes the risk of human errors during deployments, and ensures a consistent and reliable deployment process. GitOps Deployment Strategies Rolling Strategy The Rolling Strategy is a deployment approach where new changes are incrementally rolled out to the target environment while the existing version remains operational. This gradual deployment minimizes downtime and allows for easy rollbacks if issues arise during the deployment process. Canary Deployment Canary Deployment is a technique where a small subset of users or servers receives the new changes while the majority continues to use the existing version. This approach helps validate the changes in a real-world environment with reduced risk. If the canary group shows positive results, the changes are gradually rolled out to the entire system, ensuring a smooth transition. Blue-Green Deployment Blue-Green Deployment involves maintaining two identical environments—blue and green. The current version of the application runs in one environment (e.g., blue), while the new version is deployed to the other (e.g., green). Once the green environment is thoroughly tested and verified, traffic is switched from the blue to the green environment, making it the new production version. This approach enables seamless rollbacks if issues are discovered during the deployment. A/B Deployment A/B Deployment, also known as Feature Toggling, allows for deploying multiple versions of a feature simultaneously. This approach enables teams to test different implementations or user experiences and analyze their performance and impact on users. By gradually exposing different features to different user groups, A/B Deployment allows for data-driven decision-making and fine-tuning of features before full rollout. GitOps Best Practices Avoid Mixed Environments Maintain clear separation between development, staging, and production environments. Avoid mixing different configurations or states, as this can lead to unpredictable outcomes and make it challenging to identify the root cause of issues. Separating environments ensures that changes are tested thoroughly in isolated environments before reaching production. Leverage the Request Discussion Encourage collaboration and knowledge sharing among team members by using MRs or PRs as platforms for discussions. This ensures that all changes are thoroughly reviewed, tested, and approved by relevant stakeholders before being deployed. Discussions within MRs or PRs provide valuable feedback and foster a culture of continuous improvement. Policy as Code Implementing policies as code helps ensure compliance with organizational standards and best practices. Policies defined in code are version-controlled and can be automatically enforced during
NetDevOps — A Comprehensive Guide with Components and Obstacles
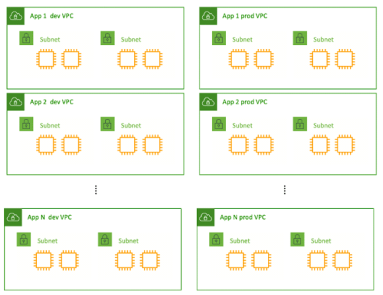
Considering the automation through Agile development processes, the software development industry has experienced a massive shift towards NetDevOps. The credit goes to its underlying network infrastructure offering network automation to fast-paced modern businesses. Since the non-DevOps approach hovers around tools, developers may experience a lack of traceability, testing, and collaboration. Here NetDevOps can help you cop with these limitations and eliminate security vulnerabilities while ensuring expected performance. Similarly, there’s a glut of things you need to know about NetDevOps if you’re looking to incorporate it into your development process. This guide will lead you to the various NetDevOps components and obstacles for a better understanding. What is NetDevOps and Why is it Worth Using? As the term describes itself, NetDevOps is a technical blend of Networking and DevOps. It streamlines the DevOps principles for the deployment and management of network services. If we dig deeper, NetDevOps apply CI/CD DevOps concepts to networking activities for faster delivery. In addition to this, its automated workflows bolster the abstraction, codification, and Infrastructure as Code (IaC) implementation. NetDevOps also eliminate the configuration drift to embed quality and resiliency within the network. In a nutshell, it improves agility by driving clear workflows aiding auditing, governance, and troubleshooting. Challenges You May Face During NetDevOps Development Risk Aversion One of the challenges that organizations may face during NetDevOps development is risk aversion. Many companies are hesitant to adopt new technologies and practices due to the fear of potential failures or disruptions to their existing network infrastructure. This risk aversion can hinder the adoption of NetDevOps methodologies, which emphasize automation, continuous integration, and continuous delivery. To address this challenge, organizations need to focus on building trust by demonstrating the benefits and success stories of NetDevOps implementation. Technical Debt Technical debt refers to the accumulated shortcuts, workarounds, and suboptimal code or configurations that result from rushed or incomplete implementation of network automation processes. This can lead to various issues, including increased complexity, reduced maintainability, and decreased scalability. To mitigate technical debt, organizations should prioritize code quality, conduct regular code reviews, and follow established best practices and coding standards. Implementing automated testing frameworks and leveraging continuous integration and delivery pipelines can help identify and address technical debt early in the development process. Skills Shortage NetDevOps development requires a unique set of skills that combine network engineering, software development, and automation expertise. However, finding individuals with a strong skill set in these areas can be challenging due to the shortage of qualified professionals. To address this issue, organizations can invest in training and upskilling their existing network and IT teams. This can include providing access to relevant courses, certifications, and hands-on training programs. Collaboration with external training providers or universities can also help bridge the skills gap. Documentation Effective documentation plays a crucial role in NetDevOps development, as it ensures that network configurations, automation workflows, and troubleshooting processes are well-documented and accessible to the team. However, maintaining up-to-date and comprehensive documentation can be challenging, especially when changes occur rapidly in dynamic network environments. Organizations can address this challenge by adopting documentation frameworks and tools that facilitate automated documentation generation. Version control systems, wiki platforms, and collaborative document editing tools can also help streamline the documentation process. Unstandardized Data NetDevOps development relies on gathering and analyzing network data to drive automation and decision-making processes. However, network data can be highly diverse and unstandardized, making it challenging to extract meaningful insights and build reliable automation workflows. Organizations should invest in data normalization and standardization techniques to ensure consistency and compatibility across different data sources. This can include using standardized data models, implementing data transformation pipelines, and leveraging data analytics tools for data cleansing and preprocessing. Tool Limitations NetDevOps development often requires the use of various tools and technologies, including network configuration management systems, automation frameworks, and orchestration platforms. However, tool limitations can arise, such as a lack of integration capabilities, limited scalability, or inadequate support for specific network devices or protocols. To overcome these challenges, organizations should thoroughly evaluate and choose tools that align with their specific requirements and network environment. They should also consider open-source solutions that offer flexibility and community support. Top NetDevOps Components Modularity Modularity is a key component of NetDevOps, enabling the creation of flexible and scalable network architectures. By breaking down network systems into modular components, organizations can easily adapt and scale their networks as per evolving requirements. Modularity facilitates the deployment of microservices, allowing for the independent development and deployment of specific network functionalities. This approach not only enhances agility but also simplifies troubleshooting and maintenance, as issues can be isolated to specific modules. For instance, using containerization technologies like Docker, network functions can be encapsulated within lightweight, portable containers, ensuring consistent behavior across different environments. Example 1 – Multiple applications in a single VPC network architecture Example 2 – Single application per VPC network architecture Cultural Changes Cultural changes play a crucial role in successfully implementing NetDevOps. Traditionally, network and operations teams operated in silos, with limited collaboration between them. However, NetDevOps encourages a cultural shift towards increased collaboration, communication, and shared responsibility. By fostering a DevOps culture, organizations can break down barriers between different teams, promoting a collaborative approach to network management. This cultural shift involves embracing shared goals, establishing cross-functional teams, and encouraging continuous learning and skill development. Automation and Infrastructure as Code Automation and Infrastructure as Code (IaC) are pivotal components of NetDevOps, enabling organizations to achieve faster and more efficient network deployments. Automation eliminates manual, error-prone tasks and accelerates the provisioning and configuration of network devices. Tools like Ansible, Puppet, or Chef enable the automation of network device configurations, ensuring consistency and reducing human errors. Infrastructure as Code allows network infrastructure to be defined and managed through machine-readable configuration files, promoting version control and reproducibility. Continuous Integration/Continuous Deployment Continuous Integration/Continuous Deployment (CI/CD) practices are integral to NetDevOps, enabling organizations to rapidly and reliably deploy network changes. CI/CD pipelines automate the process of integrating code changes, testing them, and deploying them to
Kubernetes Persistent Volumes — 5 Detailed Steps to Create PVs
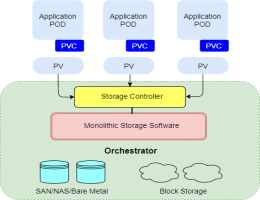
If you want to persist data in Kubernetes, you may utilize the readable and writable disk space available in Pods as a convenient option. But one thing you must know is that the disk space depends on the lifecycle of Pod. Unsurprisingly, your application development process features independent storage available for every node and can handle cluster crashes. Kubernetes Persistent Volumes got your back with their independent lifecycle and great compatibility for stateful applications. This article will lead you to 5 extensive steps to create and implement persistent volumes in your cluster. Before that, let’s dig down to know what exactly persistent volumes in Kubernetes are along with some important terms! Persistent Volumes in Kubernetes A Kubernetes Persistent Volume is a provisioned storage in a cluster and works as a cluster resource. It’s a volume plugin for Kubernetes with an independent lifecycle and no dependency on the existence of a particular pod. Unlike containers, you can read, write and manage your databases without worrying about disk crashes because of restart or termination of the pod. As a shared unit, all the containers in a pod can access the PV and can restore the database even if an individual container crashes. Here are some important terms you must know! Access Modes The accessModes represent the nodes and pods that can access the volume. The field ReadWriteOnce defines every pod having access to read and write the data in a single mode. If you’re using Kubernetes v1.22, you can read or write access on a single node using ReadWriteOncePod. Volume Mode The volumeMode field is mounting functionality of volume into the pods based on a pre-set directory. It defines the behaviour of volume in each Filesystem of a pod. Alternatively, you can use a volume as a raw block storage without any configuration with a Block field. Storage Classes As the name describes, storage classes are the different storage types you can use according to the hosting environment of your cluster. For instance, you can choose azurefile-csi for Microsoft Azure Kubernetes (AKS) clusters while do-block-storage is great for DigitalOcean Managed Kubernetes. Creating a Persistent Volume Step 1: YAML file The process of creating Kubernetes persistent volumes starts with creating a YAML file. The storage configuration represents a simple persistent volume of 1 Gi capacity. Here’s how you can create a YAML file for your PV in Kubernetes: apiVersion: v1 kind: PersistentVolume metadata: name: example-pv spec: accessModes: ReadWriteOnce capacity: storage: 1Gi storageClassName: standard volumeMode: Filesystem Step 2: Adding Volume to the Cluster Once you have created the Persistent Volume, you can add your new persistent volume to your cluster. We recommend using Kubectl for this to make it easier. To add new persistent volume, run: $ kubectl apply -f pv.yaml If you see the following error message while running the command, The PersistentVolume "example-pv" is invalid: spec: Required value: must specify a volume type Try using dynamic volume creation which will automatically create a persistent volume whenever it’s used. That’s because the cloud providers usually restrict allocating inactive storage in the cluster and dynamic volume can be your good-to-go option. Step 3: Linking Volumes to Pods Linking PVs with the pods requires the request to read/write files in a volume. Here the Persistent Volume Claim (PVC) can get you access to the example-pv volume. Let’s see how an example volume claim looks like! apiVersion: v1 kind: PersistentVolumeClaim metadata: name: example-pvc spec: storageClassName: "" volumeName: example-pv As discussed above, you may need dynamic volume creation in some scenarios. You can request a claim for that in the way mentioned below. apiVersion: v1 kind: PersistentVolumeClaim metadata: name: example-pvc spec: accessModes: – ReadWriteOnce resources: requests: storage: 1Gi storageClassName: standard Now, you have unlocked accessModes and storageClassName fields after the claim. All you need to do is to apply the claim to your cluster using Kubectl. Run the following command to quickly apply the claim to your cluster. $ kubectl apply -f pvc.yaml persistentvolumeclaim/example-pvc created In the last, use the volumes and volumeMount fields to link the claim to your pods. This will add pv to your containers section of the manifest and make the files overlive the container instances. To link the claim, run: apiVersion: v1 kind: Pod metadata: name: pod-with-pvc spec: containers: name: pvc-container image: nginx:latest volumeMounts: – mountPath: /pv-mount name: pv volumes: – name: pv persistentVolumeClaim: claimName: example-pvc Step 4: Demonstrating Persistence In the demonstration, you can verify the behaviour of PV in different scenarios. Let’s take a quick example for better understanding. Get a shell to the pod: $ kubectl exec –stdin –tty pod-with-pvc — sh Write a file to the /pv-mount directory mounted to: $ echo "This file is persisted" > /pv-mount/demo Detach the file from the container: $ exit Delete the pod using kubectl: $ kubectl delete pods/pod-with-pvc pod "pod-with-pvc" deleted Recreate the pod: $ kubectl apply -f pvc-pod.yaml pod/pod-with-pvc created Get a shell to the container and read the file: $ kubectl exec –stdin –tty pod-with-pvc — sh $ cat /pv-mount/demo This file is persisted Step 5: Managing Persistent Volumes Kubectl allows you to manage your Kubernetes Persistent Volumes whether you want to retrieve a list or remove a volume. To retrieve a list of PVs, run: $ kubectl get pv NAME CAPACITY ACCESS MODES RECLAIM POLICY STATUS CLAIM STORAGECLASS REASON AGE pvc-f90a46bd-fac0-4cb5-b020-18b3e74dd3b6 1Gi RWO Delete Bound pv-demo/example-pvc do-block-storage 7m52s Review persistent volume claims: $ kubectl get pvc NAME STATUS VOLUME CAPACITY ACCESS MODES STORAGECLASS AGE example-pvc Bound pvc-f90a46bd-fac0-4cb5-b020-18b3e74dd3b6 1Gi RWO do-block-storage 9m Sometimes, a volume or PV claim may show a Pending status as the storage class is yet to provision storage. But you can check what’s slowing down the claim process in object’s event history with describe command. $ kubectl describe pvc example-pvc … Events: Type Reason Age From Message —- —— —- —- ——- Normal Provisioning 9m30s dobs.csi.digitalocean.com_master_68ea6d30-36fe-4f9f-9161-0db299cb0a9c External provisioner is provisioning volume for claim "pv-demo/example-pvc" Normal ProvisioningSucceeded 9m24s dobs.csi.digitalocean.com_master_68ea6d30-36fe-4f9f-9161-0db299cb0a9c Successfully provisioned volume pvc-f90a46bd-fac0-4cb5-b020-18b3e74dd3b6 Conclusion: By combining Kubernetes and Persistent Volumes, you can effectively and easily