If you want to persist data in Kubernetes, you may utilize the readable and writable disk space available in Pods as a convenient option. But one thing you must know is that the disk space depends on the lifecycle of Pod.
Unsurprisingly, your application development process features independent storage available for every node and can handle cluster crashes. Kubernetes Persistent Volumes got your back with their independent lifecycle and great compatibility for stateful applications.
This article will lead you to 5 extensive steps to create and implement persistent volumes in your cluster. Before that, let’s dig down to know what exactly persistent volumes in Kubernetes are along with some important terms!
Persistent Volumes in Kubernetes
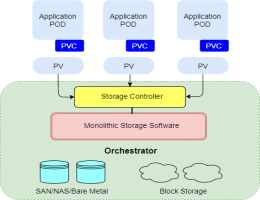
A Kubernetes Persistent Volume is a provisioned storage in a cluster and works as a cluster resource. It’s a volume plugin for Kubernetes with an independent lifecycle and no dependency on the existence of a particular pod.
Unlike containers, you can read, write and manage your databases without worrying about disk crashes because of restart or termination of the pod. As a shared unit, all the containers in a pod can access the PV and can restore the database even if an individual container crashes.
Here are some important terms you must know!
Access Modes
The accessModes represent the nodes and pods that can access the volume. The field ReadWriteOnce defines every pod having access to read and write the data in a single mode. If you’re using Kubernetes v1.22, you can read or write access on a single node using ReadWriteOncePod.
Volume Mode
The volumeMode field is mounting functionality of volume into the pods based on a pre-set directory. It defines the behaviour of volume in each Filesystem of a pod. Alternatively, you can use a volume as a raw block storage without any configuration with a Block field.
Storage Classes
As the name describes, storage classes are the different storage types you can use according to the hosting environment of your cluster. For instance, you can choose azurefile-csi for Microsoft Azure Kubernetes (AKS) clusters while do-block-storage is great for DigitalOcean Managed Kubernetes.
Creating a Persistent Volume
Step 1: YAML file
The process of creating Kubernetes persistent volumes starts with creating a YAML file. The storage configuration represents a simple persistent volume of 1 Gi capacity.
Here’s how you can create a YAML file for your PV in Kubernetes:
<span class="hljs-attr">apiVersion:</span> <span class="hljs-string">v1</span>
<span class="hljs-attr">kind:</span> <span class="hljs-string">PersistentVolume</span>
<span class="hljs-attr">metadata:</span>
  <span class="hljs-attr">name:</span> <span class="hljs-string">example-pv</span>
<span class="hljs-attr">spec:</span>
  <span class="hljs-attr">accessModes:</span>
     <span class="hljs-string">ReadWriteOnce</span>
  <span class="hljs-attr">capacity:</span>
     <span class="hljs-attr">storage:</span> <span class="hljs-string">1Gi</span>
  <span class="hljs-attr">storageClassName:</span> <span class="hljs-string">standard</span>
  <span class="hljs-attr">volumeMode:</span> <span class="hljs-string">Filesystem</span>
Step 2: Adding Volume to the Cluster
Once you have created the Persistent Volume, you can add your new persistent volume to your cluster. We recommend using Kubectl for this to make it easier. To add new persistent volume, run:
$ kubectl apply -f pv.yamlIf you see the following error message while running the command,
The PersistentVolume "example-pv" is invalid: spec:
Required value: must specify a volume type
Try using dynamic volume creation which will automatically create a persistent volume whenever it’s used. That’s because the cloud providers usually restrict allocating inactive storage in the cluster and dynamic volume can be your good-to-go option.
Step 3: Linking Volumes to Pods
Linking PVs with the pods requires the request to read/write files in a volume. Here the Persistent Volume Claim (PVC) can get you access to the example-pv volume. Let’s see how an example volume claim looks like!
apiVersion: v1
kind: PersistentVolumeClaim
metadata:
  name: example-pvc
spec:
  storageClassName: ""
  volumeName: example-pv
As discussed above, you may need dynamic volume creation in some scenarios. You can request a claim for that in the way mentioned below.
apiVersion: v1
kind: PersistentVolumeClaim
metadata:
  name: example-pvc
spec:
  accessModes:
  - ReadWriteOnce
  resources:
    requests:
      storage: 1Gi
    storageClassName: standard
Now, you have unlocked accessModes and storageClassName fields after the claim. All you need to do is to apply the claim to your cluster using Kubectl. Run the following command to quickly apply the claim to your cluster.
$ kubectl apply -f pvc.yaml
persistentvolumeclaim/example-pvc created
In the last, use the volumes and volumeMount fields to link the claim to your pods. This will add pv to your containers section of the manifest and make the files overlive the container instances. To link the claim, run:
apiVersion: v1
kind: Pod
metadata:
  name: pod-with-pvc
spec:
  containers:
    name: pvc-container
    image: nginx:latest
    volumeMounts:
     - mountPath: /pv-mount
       name: pv
  volumes:
   - name: pv
     persistentVolumeClaim:
     claimName: example-pvc
Step 4: Demonstrating Persistence
In the demonstration, you can verify the behaviour of PV in different scenarios. Let’s take a quick example for better understanding.
Get a shell to the pod:
$ kubectl exec --stdin --tty pod-with-pvc -- shWrite a file to the /pv-mount directory mounted to:
$ echo "This file is persisted" > /pv-mount/demoDetach the file from the container:
$ exitDelete the pod using kubectl:
$ kubectl delete pods/pod-with-pvc
pod "pod-with-pvc" deleted
Recreate the pod:
$ kubectl apply -f pvc-pod.yaml
pod/pod-with-pvc created
Get a shell to the container and read the file:
$ kubectl exec --stdin --tty pod-with-pvc -- sh
$ cat /pv-mount/demo
This file is persisted
Step 5: Managing Persistent Volumes
Kubectl allows you to manage your Kubernetes Persistent Volumes whether you want to retrieve a list or remove a volume.
To retrieve a list of PVs, run:
$ kubectl get pv
NAME CAPACITY ACCESS MODES RECLAIM POLICY STATUS CLAIM STORAGECLASS REASON AGE
pvc-f90a46bd-fac0-4cb5-b020-18b3e74dd3b6 1Gi RWO Delete Bound pv-demo/example-pvc do-block-storage 7m52s
Review persistent volume claims:
$ kubectl get pvc
NAME STATUS VOLUME CAPACITY ACCESS MODES STORAGECLASS AGE
example-pvc Bound pvc-f90a46bd-fac0-4cb5-b020-18b3e74dd3b6 1Gi RWO do-block-storage 9m
Sometimes, a volume or PV claim may show a Pending status as the storage class is yet to provision storage. But you can check what’s slowing down the claim process in object’s event history with describe command.
$ kubectl describe pvc example-pvc

...
Events:
  Type      Reason              Age                 From            Message
  ----      ------              ----                ----            -------

  Normal   Provisioning        9m30s               dobs.csi.digitalocean.com_master_68ea6d30-36fe-4f9f-9161-0db299cb0a9c        External provisioner is provisioning volume for claim "pv-demo/example-pvc"
  Normal   ProvisioningSucceeded  9m24s               dobs.csi.digitalocean.com_master_68ea6d30-36fe-4f9f-9161-0db299cb0a9c        Successfully provisioned volume pvc-f90a46bd-fac0-4cb5-b020-18b3e74dd3b6
Conclusion:
By combining Kubernetes and Persistent Volumes, you can effectively and easily set up complex applications with reliable storage options. With easy scaling capabilities, your application will only stand to benefit from this robust data persistence solution.
Furthermore, integrating version control tools allows you to store backups of your databases in case of an unexpected event on the cluster. This ensures you are never at risk of losing critical information.
With its reliable storage space, scalability, and flexibility, using Kubernetes Persistent Volumes for data persistence is a great way to ensure that all of your data remains safe and secure no matter what happens!